How to mine NEXA (nexapow) on Windows
How to mine NEXA (nexapow) on Windows
This simple walk through is easy to understand and provides detailed — step by step instruction, including some helpful tips that even some veterans may find useful. Use this guide to mine nexa on your windows computer.
(you may skip farther below to find specific details on the wallet, miners, command line preferences as well as discord links at the bottom of this text.)

Introduction:
This guide will be a simple and basic walk-through for new or inexperienced window users to begin mining the proof of work cryptocurrency NEXA for the first time. Proof of work cryptocurrencies are valued because they are decentralized due to the ability for each participant to earn and contribute in the network by mining or by simply keeping their wallet online (called a node) and connected to the network.
In this guide you will learn to setup a wallet to store your NEXA coins, prepare the windows environment to mine, download the mining software and then use the interface on Zergpool to view your mining earnings after you have started the software on your computer.
Zergpool is a pooled mining service which offers a range of payout options, such as Bitcoin Cash, Dogecoin, or even Monero — but also allow users to get paid out in NEXA as well. Mining with a pool is recommended for most users, especially if you have something like a laptop or just not many graphics cards.
NEXA is a decentralized crypto currency with no central authority. As a miner you are maintaining the ledger ensuring transactions are legitimate and also getting rewarded for your effort. This means you have an easy and low-risk way to gain exposure and equity in most cryptocurrencies, simply using the power of your own computer! This is a design similar to the one Satoshi used to build bitcoin.
By mining shared with the pool, you get part of the block by working together with other miners. You get a percent of the block based on the weight and values of the shares your computer hardware delivers to the pool, based on its overall efficiency.
If you feel you have powerful hardware or just want to try your luck, you could attempt to solo or party mine on zergpool as well. Find the discord link at the end of this guide for help setting up a large farm on solo or a group of miners on party mining. For most miners, especially someone getting started — shared pool mining is recommended as the most fair and quickest way to get paid. This guide will teach you how to do that.
Preparation:
You will need to prepare the folder where you will install the mining software. If you are new to mining and want to try on a windows operating system, please keep in mind that windows anti-virus is incredibly hostile to all forms of mining and will always flag miners as malicious software, even if you have downloaded it from a trusted source such as github. If you find that you are having trouble getting mining software to run on windows, try this workaround:
Press the “windows” key on the taskbar or on your keyboard. Once the menu pulls up, start typing in “exclusions” on your keyboard. The tab will automatically recognize your typing and a page to the windows settings for anti-virus exclusions will appear. Click on this option.
This will take you to the “virus and threat protection” options menu. Under “Virus and threat protection settings” there is a blue link which says “manage settings.” Click this and then scroll down until you find “Exclusions.” Click on the blue link which says “add or remove exclusions”
This will bring up another tab, which has a box with a plus arrow stating “+ add an exclusion” Clicking this gives a drop down selection. Please select the option “Folder.” Now a pop up appears which shows you the entire computer directory. Navigate to the “documents” director and create a new folder by right clicking in the inside area and choosing “new folder.” Name this new folder anything like “mining” and then choose “Select folder” with the option on the bottom right until you have chosen this new folder.
Once you are done you will return to the windows security tab which we were in before and you should now see the new exclusion folder directory path appear. This will allow any program running from this folder to avoid antivirus scans which may affect mining, but not affect the security of the rest of your system.
Another thing to consider doing at this point is taking advantage of a tool known as “O+O Windows Shutup.” This removes certain tasks which windows uses to track you. This adds security to your computer, as well as freeing up a bit of your processor to mine more efficiently that would otherwise be running these tasks.
O+O Windows Shutup for removing windows bloatware:
https://www.oo-software.com/en/shutup10
Now that you have created an area within your file system to safely store and run mining software, download BZMiner.
Creating your wallet
If you have not already and would like to setup your NEXA wallet — you can find the official wallet release below:
https://nexa.org/node
(Download and setup the windows “full node”)
You can run this wallet in a separate folder from your miners for security, or even a separate computer. Once you start the file — it will need to synchronize with the network, connect to peers and establish the ledger of the block history. This may take some time, allow it to run overnight or while away. This is where you can get your “receiving” wallet address — copy and paste this somewhere as you will need this later.
As a wallet owner, you are the sole custodian of your own funds, if you fail to secure your seed words properly you will lose access to your funds. That means If they are lost or stolen, no one can help you restore your funds! They will be lost forever!
If you need additional or more detailed assistance on how to download, use and maintain your wallet, please refer to the official documentation distributed by the NEXA community:
https://medium.com/@nexacommunity/nexa-qt-desktop-wallet-tips-tricks-and-troubleshooting-cd302d1f31a
If you already have a wallet from another crypto, for example, Bitcoin Cash and would prefer to mine NEXA with your GPU and get paid out in Bitcoin Cash, you may do that as well. The section about setting up BZMiner listed below will teach you how to connect your miner, make sure to remember to change the username and password settings to the appropriate wallet when you setup your miner, using c=BCH instead of c=NEXA in the password and entering your Bitcoin Cash address as the wallet instead of your NEXA address.
Setting Up BZMiner:
https://github.com/bzminer/bzminer/releases
Using the link above, download and extract BZMiner into the folder you prepared for mining. Navigate to the folder and find the list of example batch files. Right click to “rename” one of the available example batch files anything that you will be able to remember. Then right click again and click “Edit” (pick notepad if asked).
Once the file opens, there will be something written already. Erase the example text and Copy and Paste from the below code instead. Remember to change the YOUR_WORKER_NAME value to your wallet address. This is how the pool knows where to send your rewards for mining.
Copy and paste the below into the empty batch file:
@echo off
cd /d %~dp0
bzminer -a nexa -w YOUR_WALLET_ADDRESS -p stratum+tcp://nexapow.mine.zergpool.com:3004 --pool_password c=NEXA,refcode=newminerbonus,id=RIG_NAME --nc 1
pause
You will want to change the RIG_NAME field to a specific name if you have more than one rig. The c=NEXA field is used to designate the payout currency, which is defaulted to NEXA. If you prefer to get paid in another currency, be sure to change NEXA to the coin you want to get paid out in.
The string “,refcode=newminerbonus” (without quotes) is an exclusive code used to save 40% on your pool fees, as a first time new miner of Zergpool! This is a loyalty promotion available to new miners and readers of this walk-through! Using these settings will also give you a 40% discount on your pool fees — changing from 0.5 to 0.3!

Users who want to try solo mining can add “,m=SOLO” (without quotes) to the end of their password field as well. Please note it can take several months for a single computer to find a block on solo, so not recommended for those looking for steady rewards.
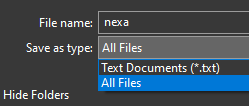
Once this is complete, hit “File” and “Save as.” This next step is important, you must make sure the file saves as a batch file not a text file. On windows, notepad will default the batchfile as a text file if you did not change the “save as type.” This would result in a file which will not run and instead will just open as a text file. To correct this you must change the “save as type” from “.txt” to “All files”(see the example image below)
You can right click on the batch file, send to desktop (shortcut) to create a shortcut link on your desktop to your GPU mining software. Close out of everything and attempt to start the shortcut batch file on your desktop. It should start the BZMiner in a command line box. It may ask you to accept some internet connection settings. The software will spit out a lot of information, so take a few minutes to observe. If everything was configured correctly you should see that your miner has connected to the pool, is hashing and is also sometimes finding shares.
LOLMiner (Alternative Mining Software)
https://github.com/Lolliedieb/lolMiner-releases/releases
Depending on your hardware, you may want to try another mining software other than BZminer. A good alternative could be “Lolminer” which you can find the releases in the link above. Make sure to follow all the same steps, but when you get to the batch file portion use the following parameters:
Copy and paste the below into the template batch file, making sure to only make changes to the “user editable portion”:
set “POOL=stratum+tcp://nexapow.mine.zergpool.com:3004”
set “WALLET=YOUR_WALLET_ADDRESS”
set “PASSWORD=c=NEXA,refcode=newminerbonus,id=RIG_NAME
set “EXTRAPARAMETERS= — apiport 8020”
Viewing your Mining Rewards
Now that you know the connection and software works, you may want to spend some time to more finely tune your GPU devices.
A free tool to adjust your GPU clock-rate on windows would be MSI afterburner:
https://www.msi.com/Landing/afterburner/graphics-cards
This part may require a lot of testing to make perfect. You can try out the website “hashrate.no” to get detailed tuning information for your specific hardware. At the end of this guide there are social links where you can get more detailed assistance with your specific hardware.
After you are satisfied with your clocking and are hashing, head over to Zergpool and type in your wallet address under the “wallet” tab. You will see a verity of detailed information, primarily your workers and your percentage of shares submitted. Once the pool has found a block, you will earn a share of the rewards!

Conclusion:
You made it to the end, great job! You are now mining with your GPU again, creating profitability from your computer’s hardware! You successfully got through the hardest part and now whenever you want to mine you just need to start the batch file. Make sure to check for updates to the mining software regularly, as occasionally things such as hashrate improvements are implemented.
You may even be able to start mining with your CPU for the first time if you checked out my ghostrider guide. Zergpool will allow you to get paid out in NEXA (or any other currency) while mining with your cpu!
Click here to learn how to mine with your CPU and get paid in NEXA
NEXA Discord: https://discord.gg/nexa
BZMiner Discord: https://discord.gg/6WmjEV6t4P
Zergpool Discord: https://discord.gg/2xuTT3Xm3G
Did you find this article to be informative? You should consider supporting decentralized initiatives by rewarding those who contribute to the ecosystem. Even a small donation would give me a big smile!
My NEXA Donation Address:
nexa:nqtsq5g5zd9msk22dfzqw69wez5g6unwrg7rwmac9kmgfl3p
Don’t have any NEXA yet?
bitcoincash: qr609gkq7mnjqzh9j0nwjgy3xl4l6ezzmq7xj43mm4
litecoin: ltc1qdyt7augpzdkk4fzvaerrj3ren8pvvjhvy8cyz6
dogecoin: DCnXGACgdYoNngjoufPTQ1DDNk71qGBW9D
monero: 86nye5vAP182z5tcDcmmapKsiFSNHnbyeGb7cDPnC4z4Bx1nfkVtAdEZwKy4Mde1TfNAaLuxc944kFA8QAXuE7gsHJkDefL